BIOS settings
If your d8b starts acting strange or won't boot up or shows the dreaded "System Error 43", check that these settings are as they should be.
Whilst booting the d8b, hold down the <delete> key and it will take you to the BIOS setup screen.
Move between headings with the arrow keys and hit <enter> to go deeper. The <+> and <-> keys in the calculator pad toggle back and forth through the available parameter values.
Follow the on screen instructions to exit or save etc.
Newer and older board settings are included.
These are downloadable PDF files:
HDR and Newer Motherboards BIOS Settings
Old Motherboards BIOS Settings
Go here, to discover which motherboard you have.
It is recommended that you follow the settings in these documents to the letter.
Do not activate "LOAD OPTIMAL SETTINGS"
If you find the BIOS settings that you have made are not being maintained over time then it's a sure sign that the battery in the CPU needs to be replaced.
The battery is a CR 2032 or DL 2032.
Control Room Monitor Pot: Jumpy!
If the C/R monitor pot becomes erratic, there are two immediate methods to solve the problem. Both require C/R speakers to be off or no signal running through the d8b. This is to protect your speakers and your ears.
Method 1: Whilst holding the <shift> button, rotate the pot several times.
Method 2: Whilst holding the <control> button, rotate the pot several times.
Some users find that doing both of the above is ideal in solving the problem.
There is a third method that is a bit more radical and should only be employed after trying the first two.
Method 3: Pull the grey knob off the shaft of the pot. It comes off with mild force. Then spray a small amount of Isopropyl Alcohol (99% or greater) from a SprayPak with a plastic tube attached to the nozzle, into the hole. Replace the knob and rotate several times to clean the pot. There is a downside to this method in that the cleaning agent causes the feel of the pot to become very loose as opposed to the silky feel it normally has. It has been discovered that the silky feel returns over time.
These methods can be similarly applied to all the V-pots if they exhibit jumpy behaviour.
Corrupt Session Files
Although the “Load Last Session At Power-Up” feature may appear to be a wonderful and convenient one, it can be of considerable concern if the last session you were working on gets corrupted somehow. In addition, if that session file is corrupt and you begin to work on another project using that corrupted session file as a template or even if you zero the board to start again, your new session file will be corrupted as well. A corrupted session file can cause the d8b to exhibit all sorts of weird behaviour like freezing up under some circumstances, some functions not working at all or behaving erratically and countless other problems that quite clearly, are not normal. The desk may not even boot at all.
Who knows how a session file gets corrupted? It could be something as simple as a power glitch at the moment you save your file or moving to a new function too quickly after saving (most computers are still saving data for a second or two after the disk window closes). Whatever the reason, the following are a few suggestions on how to avoid or at worst, combat this scenario.
- Don’t tick “Load Last Session At Power-Up” (Windows menu>Setup>General or <Control+1>). Let the d8b boot with your nice clean Start-Up session (that you have set up with all of your preferences) and then choose the session file you want to work on.
- Always start a new project from the Start-Up session.
- Make sure there is only one Start-Up session file on the HD. It should be in the “Session 5” folder if using OS 5.1 or in the “Session 3” folder if using OS 3. Sometimes a Start-Up session file can find its way to the root directory of the HD, possibly because a previous save wasn’t correctly routed. That file should be discarded, unless it is the only Start-Up session file, in which case, it should be moved to the “Session 5/3” folder for cleanliness.
- Wait a moment or two, after saving a file, before moving on.
If you suspect that a file is corrupted:
- Un-tick “Load Last Session At Power-Up” if it is ticked.
- Go to the desktop, click the HD icon, search for all “Start-up” session files and flush them down the toilet. There maybe more than one in different folders. The idea of this is to force the d8b to create a new one.
- Re-boot the d8b and a new default Start-Up session will be created in the “Session” folder.
It is a good idea, after having created your ultimate Start-Up session that you know works, to save it to a floppy or via FTP so that you don’t need to go through the set-up procedure again. In that way, after you’ve flushed the Start-Up sessions as described above, you can just copy your saved file into the “Session Folder” and re-boot to a known state.
One last thing, if one of your session files is corrupt, there is no way of salvaging it unless you have backed up your data. You will have to start again from the known, good Start-Up session.
Formatting the Hard Drive
When you need to get back to basics and start with a clean slate, you can re-format the Hard Drive and re-install the OS in one fell swoop. It's also the only way to de-fragment your files from within the d8b.
Before doing this, backup all of your data, either via FTP or to floppies. Formatting the drive erases all data.
Place Floppy Disk 1 of the OS in your computer, open it, open the “System” folder and then open the “TOOLS.INI” file in a Text Editor application. Add the line (if it doesn’t already exist):
format:on
to the bottom of the list that you see.
If the line “format:off” exists, just change the “off” to “on” (no quotation marks).
Save the file back to the floppy.
Insert Disk 1 into the d8b, boot and follow the prompts that appear on the fluoro display. The process gives you a couple of opportunities to cancel formatting if you wish. If you proceed, you will be asked to insert the 2 other OS disks.
Once the procedure is complete, eject Disk 3, place Disk 1 in your computer as before and change format:on to format:off for safety’s sake and save the file back to the floppy. This is to ensure that if you only need to do an OS re-install at a later date, the formatting option will be disabled. Store the 3 OS disks in a safe place.
Next, install the Plug-In Service Pak 3 (3 disks) by booting with disk 1 (of the Service Pak) in the floppy drive. Follow the prompts on the fluoro display. Don't forget to eject floppy 3 after the installation is complete.
NB: After formatting the HD, installing the OS and the Plug-In Service Pak 3, you will need to re-authorize V 5 or V 5.1 OS if you own and use it.
V 3 OS doesn't require authorization.
Boot the d8b and start scribbling on your clean slate.
You will need to re-authorize any plug-ins that you own so have your authorization codes handy.
If you've lost your authorization codes, the Registration and Authorization page is where you can go through the process again. Have your Electronic Serial Number and Box Codes handy.
You can download this whole procces in a PDF file from here:
Hard Drive: Replacement
The original HD in the d8b was a 540 MB Fujitsu. If by some miraculous state of affairs, you still have one of those and it is still working, consider replacing it as soon as possible to avoid future problems.
Back up all data to floppy or via FTP prior to changing the HD.
HD requirements:
- IDE
- 5400 rpm or 7200 rpm
- No greater than 32 GB (The BIOS can't recognize drives larger than this). If you can only find a larger drive, make sure that it can be clamped to read as 32 GB via jumpers on the back.
- Hitachi (IBM), Maxtor or Western Digital are recommended.
After replacing the HD, it will need to be formatted and your current OS installed (and authorized if OS 5.1). Installation of plug-in service pack 3 and re-authorization of all purchased plug-ins is also required.
Hard drive replacement: 10 Golden Rules
Although most information is already available from Mackie or other sources these tips
gives an integrated approach, which will help you to do the job in one work flow instead
of working your way through emerging obstacles or confronting with the wrong sequence
of activities.
Preparing before opening up your D8B computer unit
1) Look for a less used or new (enhanced) IDE hard disk drive, an 80 GB
Western Digital by example is very suitable.
2) Restrict the capacity of the drive to 32 GB by putting jumpers in the proper
place.
You can get additional information about jumper settings of the most current hard disk brands
in this document that also contains this article in a downloadable format.
3) Although advised by Mackie, donít use an already partitioned and formatted
hard disk for a (Windows) PC:
You have to Ďfeedí your D8B computer unit with a 'raw' disk. When using an already partitioned and formatted disk the BIOS of the motherboard from your D8B computer can get stuck in itís attempt to identify the disk.
If you have an already partitioned and formatted disk then use the disk maintenance- utility of Windows (XP, Vista, Windows 7), for deleting the partition, as part of the system- and computer-maintenance option within the configuration menu.
You can execute the above mentioned action by putting your IDE drive into a portable (3,5 inch) IDE-case with a USB interface connected to your desktop or laptop.
4) Make a boot-disk on a floppy disk which will contain MS-DOS 6.22 (the last available version of MS-DOS):
Several internet sites offers for free several (image) versions of MS-DOS, download from Bootdisk.com or Allbootdisks.com for this particular version.
If you don't have an internal floppy drive anymore then there are several external drives (like Freecom) available with a USB-interface.
Extract the downloaded file to a (pre) formatted floppy disk.
5) Make a back-up on floppies for all your important projects, snapshots, preset -patches, etc and get all your other Mackie floppies together:
Take also a look in your documents for the keys and authorisation codes for your version of the Mackie software and the separate plug-ins (if you have already installed), collecting all floppies for your current Mackie Operating System (like V5.1-Build 445) and for your Mackieís plug-ins Service Pack 3.
6) Type the Format:On statement in the Tools.ini file on the first floppy of your Mackie OS-version for the necessary and proprietary Mackie procedures.
You can open the Tools.ini file with Wordpad or another basic text-editor on your desktop or laptop when you have an internal or external floppy drive.
Replacing the disk within the D8B computer
7) Disconnect the old disk and connect the new IDE disk but leave the old drive temporarily in place.
You have first going to step 8 before you can replace the drive definitely, Mackie calls this the 'conditioning of the drive'.
8) Put the boot-disk with MS-DOS in the floppy drive of your D8B computer unit, power on and give respectively the MS-DOS commands A:/ FDISK C: and A:/ FORMAT C: on the keyboard connected to your Mackie D8B computer unit.
The FDISK-command creates a master boot record with a partition-table where as default your new disk will be defined as the primary partition where the Mackie operating system will get placed during the regular Mackie installing procedure. Don't give any extra sub-commands with this command. By default the right characteristics of your drive will be taken into account.
The FORMAT-command will define the type of file system which will be used on the drive. By default it will be FAT-32 where this type will be written down into the before created partition-table, also the file allocation-table will be created for indexing purposes for the files those will be written later on the drive.
The internet sites Computerhope.com and Wikipedia.org gives detailed information about both commands and its function.
9) Change your new IDE drive definitely for the old drive by mounting it into the proper place.
Installing the Mackie OS-version and the plug-ins (if you have any)
10) Follow the regular installing procedure of Mackie by starting up with the first floppy of your Mackie OS-version, eventually followed by the plug-in floppies if all OS-floppies are correctly loaded on your new disk.
You can unlock the OS-version and the plug-ins with the keys and the authorisation codes you have already used on your old drive, it is not necessary to obtain new codes (as far you have documented these properly).
Have fun for many years with your reborn D8Babe!
Keep Your Motor Runnin': Spare Parts
If your clock won’t tock or your faders wont fade, your power supply won’t supply or your cables are disabled and you have exhausted all avenues trying to find that elusive part you need including Mackie Service and Spare Parts, you may be able to find that hard to get fader board, V-Pot, Power Supply cable or doo-dad by contacting SteveT (champion forum contributor) at Draknkep@pacbell.net
MIDI Breakout Cable: Roll Your Own
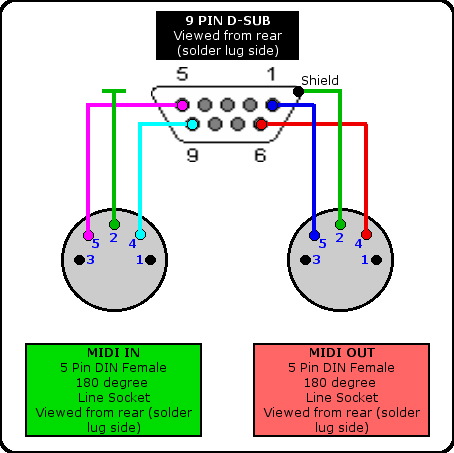
Because the little MIDI breakout 9-pin male D-subminiature connector with MIDI female line sockets at the other end tends to go missing or is never delivered with consoles purchased second-hand and they seem to be scarce on the ground from electronic suppliers, here’s a diagram that lets you know the pin configurations so that you can roll your own.
The shield, if you use twin core shielded cable, doesn’t connect to a pin in the DB-9 socket on the back of the d8b CPU and it isn’t necessary. If you feel you must connect a shield, connect Pin 2 of the MIDI OUT plug to a ring lug on the DB-9 end and put it under one of the screws that secures the connector. It doesn't carry any current and shielding really isn't necessary so it doesn't matter whether it's connected or not (other than perhaps for those who have to pass EMI testing). Connect the shield to pin 2 of the MIDI IN connector but leave it unconnected at the DB-9 end.
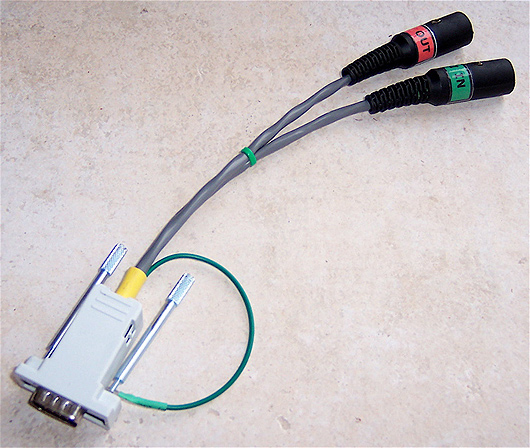
The finished product should look similar to this:
If you also have a Mackie HDR or MDR recorder, then because they use the same 9 pin D-Sub connector protocol as the d8b, you could, theoretically, avoid using the MIDI DIN connectors and make up a crossover cable to run between them, thus:
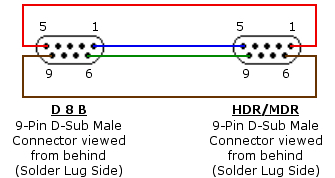
Shielding, if required, should be dealt with in a similar fashion to above.
You can't use commercially available cables because they don't cross the pin connections over.
Be aware that if you go this route, you won't be able to interface the desk or the recorder with any other MIDI equipment you may have.
Rail Capacitor: Identification
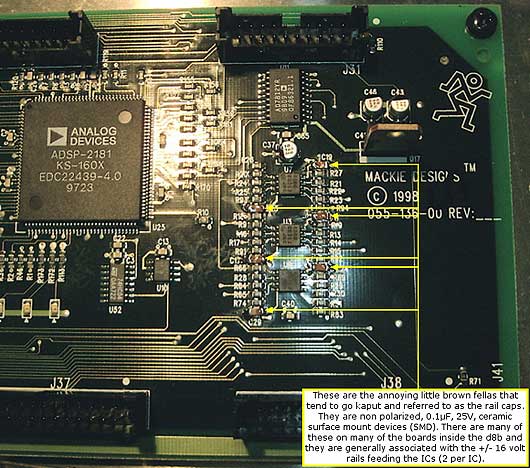
Thanks to forum member hyaena (Manfred), we are now able to recognize the dreaded rail cap and perhaps, for those not faint of heart, attempt to perform in house service.
Manfred had occasion to replace some of these caps on the Brain Board and with the help of his tech, they isolated one that had shorted, causing the 16 volt rail to plummet to 3 volts.
Here is an edited version of his initial post wanting help:
First thing I noticed was a mains hum on the control room output. Second was faders moving slowly down. No access to faderbanks and v-pots possible.
Meterbridge showed incoming signals, but there was no output on the mains out, except that hum. Monitor shows the exact position of automated faders.
Next thing was a "thumping" noise starting slow and accelerating.
I have a new motherboard (nearly one year now, thanks again to SteveT!!) after an "error 43" and did the ribbon cable connection cleaning after having trouble with distortion on the mains out - that problem was solved.
There's similar topics on the forum already, I know, but none are exactly the same as mine and most discussions stop without a solution at a certain point... maybe sometimes there is no solution.
Does anyone have a clue where to start?
I already reseated the BFC and data cable, created a new startup session, no help.
After much ado, Manfred had his tech locate the faulty capacitor and replace not just it but a further 5 associated with a cluster of ICs on the brain board. Following, is his reply to a question regarding the procedure:
Here is some more detailed information about the caps from my technician:
C17 had a short circuit with the effect of attenuating the 16V rail down to 3V.
C17 (and for reasons of precaution C11, C19, C23, C24 and C29) were replaced.
These are +/- railcaps for op-amps U3, U7 and U8.
We used SMD, ceramic, caps 0.1µF, 50V model 0805.
Original type would have been 0603 but the slightly bigger 0805 are more reliable yet still possible to assemble.
Note: Because the original caps were falsely marked as 25 Volt tolerance, it's feasible that correctly marked 25 Volt caps would be more than adequate for the 16 Volt rails. However, the price difference for 50 Volt jobs is negligible so I guess, go for broke.
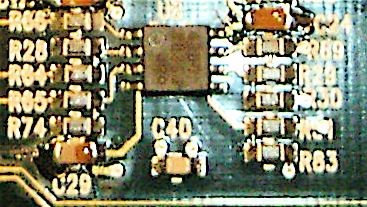
Photos: Manfred Deppe
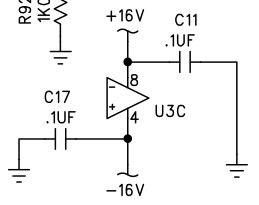
If strange symptoms occur and appear to be localized (eg. a fader board etc.) be sure to check the schematics associated with the particular board causing your concern.
Following, is a diagram indicating what to look for regarding the implementation of the rail caps on each board. C11 and C17 in this example represent the rail caps associated with U3 on the Brain Board. This is just for indication only. The cap numbers and IC numbers will be different all over the place but will always be straddled between +16 Volts or -16 Volts and ground.
See also: Rail Capacitor: Legendary Cause Of d8b Weirdness
Rail Capacitor: Legendary cause of d8b weirdness
Over the years, since the d8b's introduction, there have been many cases reported of the desk exhibiting what can only be described as lunatic behaviour. This behaviour has more often than not, been attributed to faulty or failed “rail capacitors”.
The symptoms can be all or one or any combination of the following:
- All leds on the desk flashing of their own volition
- V-pots swirling back and forth
- Faders dancing to their own tune
- Thumps of about 2 per second emanating from the speakers
- All meters pulsing in sync with the thumps
- A low constant hum emanating from the speakers
- Flashing or intermittent fluoro display
- Control from the console is usually lost, but the GUI seems to keep responding when poked at by a mouse or addressed with the keyboard.
A general description of what a rail capacitor is and does is in order.
- In electronic terms "rail" typically refers to one of the power supply voltages as in "the +12V Rail" Assuming that, a "rail capacitor" would be a filter capacitor on the secondary side of the power supply. These are usually relatively large value electrolytic capacitors and will usually fail in the "open" state. The purpose of these caps is to filter out any AC component to the voltage on the DC bus (rail). If the cap opens then it is basically like it was not there and AC noise on the rail won't get filtered. Components like comparitors and A/D converters use the DC buses for reference and AC on the bus can potentially wreak havoc. The most common symptom of failed power supply filter caps is 60 cycle, or 120 cycle hum. (Courtesy: zandtanista)
- The Famous d8b Rail Capacitors are indeed connected between the power supply rail and ground, but they're not the power supply filter capacitors, they're decoupling capacitors on the various boards, designed to keep hash generated on the board from getting off the board and on to another board through the power supply wiring. They're surface mount capacitors, 0.1 uF I think. (Courtesy: Mike Rivers)
The capacitors that fail have been traced to a faulty or wrongly marked batch (the voltage rating marked on the component was higher than its actual rating) and were installed mainly in the earlier boards. If you have what is called the newer motherboard in your CPU (find out here) and the desk is of the same era, you are much less prone to experiencing the problem.
Long story short, these “bad” capacitors can fail over time and you may experience the abovementioned symptoms.
The advice then, is:
- If you find yourself in the rail capacitor boat, resign yourself to the fact that you will need to send the board back to The Mothership for service. Trying to trace and ascertain which cap is bad and then, even if you find it, attempting to de-solder the old and solder the new SMD, which will require the patience of Job, is going to cause you way more grief than putting your hand in your pocket. As a future proofing measure, since you've gone to the trouble of shipping your console and it's open and the soldering iron is hot, it's worth requesting that the service tech replace all of the bad decoupling caps. These things cost cents. The labour may increase the cost marginally but not as much as having to ship it again and again etc.
- Get into the habit of either turning your monitors (Main, Nearfield and Headphone) down on the amps or preferably off when you leave the d8b on and unattended for any period of time. Many a set of monitors has been reduced to dust if a rail cap goes. You should, at least, avoid that extra expense.
The obligatory anomalies:
- Sometimes clock failures exhibit some of the same symptoms as a blown rail capacitor.
- Booting the board while digital inputs or clock inputs are active can also cause some of the same symptoms.
- Short power interruptions can also exhibit some of the same symptoms.
Ask on the forum about your individual symptoms before sending the d8b off for service.
Rail Capacitor Sympthoms: Other causes
Be aware that symptoms normally related to the railcap problem are not restricted to the brainboard only.
The following symptoms were experienced:
The symptoms can be all or one or any combination of the following:
- All leds on the desk flashing of their own volition.
- V-pots swirling back and forth.
- Faders dancing to their own tune.
- Thumps of about 2 per second emanating from the speaker.
- All meters pulsing in sync with the thumps.
- A low constant hum emanating from the speakers.
The culprit was an 8-fader board (in my case 9-16). Replacing this board solved all the problem. The issue was similar to a brainboard problem so be aware of this. It's possible that this 8 fader board shorted out and provoked to the brainboard similar symptoms found when a rail cap is blown.
For those who think that a similar problem is coming from the mainboard. BEFORE jumping into drastic conclusions and point your finger to a railcap problem on the mainboard... disconnect the ribbon cables of all fader boards (both 8 fader boards and the 9 fader board) and reboot the console. If the problem stops this means that one of your fader boards or more are defective/ shorted out. If the problem persists even after disconnecting the ribbon cables of the fader boards its probably the mainboard rail cap shitty thing.
Ribbon Cable Connection Correction Procedure
The ribbon cables used to connect the various PCBs in the console have contacts that may become loose over time, possibly due to repeated cycles of heating and cooling (expansion and contraction). Just the slightest misconnection can cause interruptions to signal or power, producing frustrating problems and hours of troubleshooting and down-time.
One of the major problems caused by these loose connections is loss of wordclock sync. The main culprit seems to be an unstable connection between any of the internal ribbon cables and the back-plane PCB. The back-plane PCB is attached to the back of the card cage which all the I/O cards, effects cards and the clock card plug into. Because this PCB is central to the d8b's data/signal flow, the symptoms of a loose connection are not limited to just loss of wordclock sync, but other strange behavior as well.
The Symptoms of Lost Wordclock Sync
When the d8b loses wordclock sync, 99% of the time it will lose all functions relating to digital I/O, resulting in no audio or audio only on one side of the L/R bus. You may also see one or more of the 26 LED meters light up all the way and remain there. You may also notice a flashing */? indicator in the upper right hand corner of the fluorescent display on the d8b. All these are signs of lost sync. You may experience one of them or all of them.
Note: Most likely--because no conversions (A-D or D-A) are required to do so--the console may still pass audio through any of its three analog 2-track inputs, and then out to its 2-track analog outputs. Don't be fooled into thinking wordclock must be working correctly for this to happen.
The Major Suspect
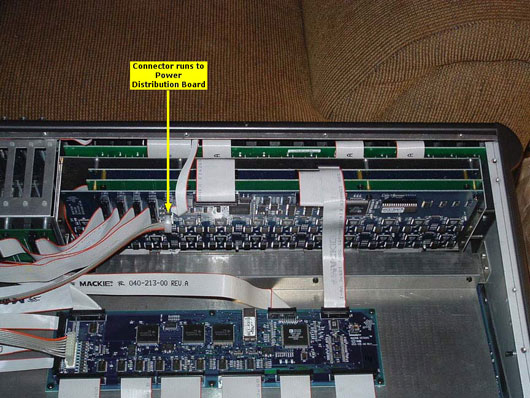
One ribbon cable in particular may be the cause of the problem, that is the ribbon cable which runs from the back-plane PCB to the Power Distribution PCB, which is mounted inside the console and connected to the “BFG” (Big Fricking Connector). If this ribbon cable moves at all, then power to the clock card may be interrupted and cause loss of sync.
The First Step
The first thing to try when sync is lost is to remove the clock card (stock or Apogee) and clean the contacts with a good brand of contact cleaner (Caig DeoxIT is highly recommended for this purpose) and then reseat the card. This may or may not cure the problem. This procedure can also be applied to the MFX/UFX or I/O cards, if you're suspecting trouble with them or you just want to try everything in order to get back to making music.
A few things happen during this process:
- 1. The contacts are cleaned
- 2. The card is reseated and a better connection may take place
- 3. By reseating the clock card, the back-plane PCB is flexed a little bit. This is possibly the most important part of the process because it tends to reseat the ribbon cables into the back-plane PCB, and that may be all it needs.
This procedure may, at least temporarily, fix the problem regarding loss of sync. If it does, excellent. If, however, you soon find that you are losing sync again, a slightly more difficult procedure (and not for the faint of heart) may be necessary.
Going Inside
This procedure is not hard if you are technically, mechanically and electronically inclined, but you will have to dive in where few have gone before. In doing this, precautions absolutely MUST be taken to avoid damage to parts in the d8b that are prone to damage from ESD (electrostatic discharge).
You must first ground the d8b, and then ground yourself to either the d8b or the ground that you have grounded the d8b to. If you do not feel comfortable working with electronics and are not aware of the standard precautions that must be taken, don't proceed by yourself. Either get someone who does understand electronics to help you, or have it done by a competent service engineer. The tech support people at Mackie will be happy to recommend an authorized repair shop in your area.
If you do decide to take this on, getting to the ribbon cables is actually quite easy.
- 1. Disconnect the d8b from its power source.
- 2. Carefully lay the console on its face, either on a cushion or blocked up so that the faders don't take all of the weight. It's a good idea to move the faders to their maximum position so that the elbow rest and not the faders are bearing the weight.
- 3. Remove the screws holding the bottom cover and set them aside in a safe place.
- 4. Remove the bottom cover.
- 5. Once you've removed the bottom cover, make sure to ground the d8b and yourself to a good ground source. A cold water pipe (not hot water) is normally a very good grounding point.
- 6. With the back of the d8b facing away from you, you will see a small PC board that attaches to the BFC (Big Fricking Connector) on the back left-hand side. Mounted on the PC board are a couple of large capacitors. Please be aware that even though the d8b is disconnected from the mains, capacitors can still hold a charge for quite some time and they can zap you. It's best to just avoid this circuit board, other than to give the ribbon cables on that board a good pull/push to make sure they are seated securely.
- 7. To the right of that PC board, you will see the card cage and the many ribbon cables that are attached to it. Very carefully, and to avoid any confusion, remove ONE end of ONE cable at a time and clean the ribbon connector and the PC board connector with a good grade of contact cleaner. It's best to use the liquid type with the small foam applicators. You can get them at any electronics store. They work better than the spray type because you can control the application in a more precise manner. After cleaning, reseat the connector.
- 8. Repeat this procedure on all the ribbon cable connectors and double check to make sure all the cables are restored to their proper places.
- 9. Replace the bottom cover making sure not to over tighten the screws. Because of the flexibility of the d8b's case/frame, it's best to put all the screws in loosely first and then tighten them up once they're all in place.
This procedure has worked to repair quite a few d8bs that had problems with losing wordclock sync, and other ailments, too.
Here is a link to photos showing the ribbon cables and the back-plane PCB:
Addendum
To keep from having trouble with loose connections, something that's possibly worth doing is to lock the ribbon cable connectors down by applying a small dab of adhesive to each end of the connector. Dow Corning offers a line of Silicone adhesives that may well do the job. DO NOT run down to your local hardware store and buy "standard" silicone RTV (the ones that smell like vinegar). The fumes these products produce when curing WILL corrode copper and other materials used in electronic components and circuit boards. It is also best to use a non-flowing RTV as it will not sag during the curing process.
This list of electronics compatible silicone adhesives from the Dow Corning website will give you a selection of various silicone products that should work. There is also a link there to find distributors for their products in your area.
To lock them in place, you only need a very small dab of adhesive on the outside of the connectors (where the male and female connectors join together). A small amount is advisable since you may want to remove these cables at a later date.
See also Loss Of Audio/Frozen Meters and Another Reason For Loss Of Audio.
Schematics
Everything included except for 2 boards in the CPU (inside the sealed OEM Power Supply) that were outsourced.
Downloadable .zip files that expand to PDFs.
Once you've downloaded and un-zipped the files, create a new folder and place all the PDF files from the other three folders there. In that way, the interactive PDF file, "d8bguide.pdf" allows you to point at any board inside the d8b and see its data.
d8b Service Manual
Schematics and technical documents
This new set of schematics and technical documents have been included here as a backup from anyhorizon's server.
There is a lot of useful info here.
d8b Service Manual 1.118 KB
d8b Service Manual (Full version) 17.086 KB
d8b Service Manual (Full easy to print out version) 4.486 KB
Console Assembly Drawings 3.130 KB
Board location 422 KB
Board location (Interactive)
You'll have to download all the files to the same directory to make it work. 163 KB
Integrated circuits used on each circuit board 190 KB
Connectors 2.265 KB
CPU Assembly Drawings 2.565 KB
Console Assembly Drawings 1.095 KB
d8b Parts 1.361 KB
Mic/Line Meter Board 108 Rev A 163 KB
Line/Master Meter Board 109 Rev A 231 KB
Analog I/O Board 110 Rev B 616 KB
Power Distribution Board 111 Rev B 104 KB
DCA Board 112 Rev C 1.285 KB
Codec Board 113 Rev B 938 KB
DSP Board 114 Rev C 975 KB
Digital I/O Board 115 Rev E 290 KB
Tape I/O Board 119 Rev B 654 KB
Control Surface 120 Rev A 565 KB
Control Surface 121 Rev A 182 KB
Output Control Surface 122 Rev A 1.802 KB
Linear Power Supply 123 Rev A 207 KB
Brain Board 136 Rev A 754 KB
EFX Backplane 163 Rev B 719 KB
Clock Card 164 Rev C 180 KB
Power Distribution 201 Rev A 91 KB
8-Way Fader 124 Rev 3 298 KB
9-Way Fader 125 Rev 3 328 KB
HDR24/96 Service Manual
Schematics and technical documents
HDR users will find here the Service Manual and a large number of PDF documents with extense technical info.
This documents have been added here as a backup from anyhorizon's server.
HDR24/96 Service Manual (All the large pages) 7.629 KB
HDR24/96 Service Manual (All the small pages) 2.844 KB
HDR24/96 Service Manual (Connectors, BIOS Settings and more) 2.747 KB
Assembly Views 1.180 KB
Exploded Views 570 KB
Wiring Diagram 53 KB
I/O Cards 1.471 KB
HDR24/96 Parts List 141 KB
HDR24/96 EPROM Replacement 417 KB
Boards:
Front Board 178 Rev A 1.845 KB
Rear Backplane 179 Rev A 506 KB
Brain Board 180 Rev B 575 KB
Remote Board 268 Rev A 602 KB
Small Remote Board 291 Rev A 1.208 KB
Post Stamp Board 359 Rev A 113 KB
ACUMA Board 367 Rev A 941 KB
All the Boards in one Document 6.554 KB
There is also this humor related document with the proper solution for the problem: HDR24/96 Chocolate made units 397 KB
TT24 Service Manual
Schematics and technical documents
TT24 users will find here a large number of PDF documents with extense technical info.
This documents have been added here as a backup from Makies's Support Portal.
TT24 Backplane PCB Assembly Schematics 395 KB
TT24 Channel Switch PCB Assembly Schematics 918 KB
TT24 Codec PCB Assembly Schematics 3.203 KB
TT24 Digi IO SPDIF PCB Assembly Schematics 500 KB
TT24 Digi IO USB PCB Assembly Schematics 194 KB
TT24 Headphone Card PCB Assembly Schematics 53 KB
TT24 Jackfield Channel 1-8 PCB Assembly Schematics 751 KB
TT24 Jackfield Channel 9-24 PCB Assembly Schematics (B00) 1.209 KB
TT24 LCD Controller PCB Assembly Schematics 423 KB
TT24 LED Display PCB Assembly Schematics 173 KB
TT24 Main Digital PCB Assembly Schematics 5.464 KB
TT24 Master Phat PCB Assembly Schematics 444 KB
TT24 Master Switch PCB Assembly Shematics 869 KB
TT24 Mic Amp PCB Assembly Schematics 728 KB
TT24 Power Supply Schematics: Layout, cables and BOM 266 KB
TT24 LCD Controller Board Assembly Schematics 437 KB
TT24 Expansion back plane card slot connectors 416 KB
TT24 Jackfield Channel 9-24 PCB Assembly Schematics (C02) 835 KB
TT24 Wiring Diagram Schematics 764 KB
Talkback Button Considerations
The talkback button on the d8b is of the same variety and quality as all the other membrane switches (Channel Select, Solo, Mute etc.) which are perfectly adequate when you are working quietly on your own and in a relatively pacific state of mind. However, if and when you are acting as producer and engineer, its use is associated with an elevated level of pressure introduced by the stress of wearing these two hats at the one time.
Consequently, when attempting to extract a stellar performance from the beautiful girl vocalist (or hunky guy or hopeless drummer, for that matter) on the other side of the glass and at the same time, you are turning knobs, watching levels and fumbling with the autolocator to achieve the perfect punch-in, the tendency can be to press the switch with the kind of force it wasn’t designed to withstand.
The consequence, unfortunately, is that the button, over time, can sink down below the control surface and become hard or impossible to operate. It also doesn’t look too flash come re-sale time.
Mackie, thoughtfully, provided a TS jack socket on the back of the console that accepts a “normally open” and preferably "momentary" switch to operate the talkback function remotely. This can be in the form of a hand held switch in a box that you make yourself or one of the various footswitches/sustain pedals that you can buy from most music retailers.
It is worth investigating and making or purchasing something like the above to avoid the inevitable.
Transport Buttons: Disappearing Legends
The silk screened legends on the transport buttons are prone to wearing off over time. The <Stop> and <Play> buttons generally being the first to go because they get the most use.
If you like to keep your d8b looking “brand spanking”, there is a solution and if you are lucky enough to still have all the legends clearly visible, you can take preventative steps right away. If your legends are worn then it might be worth ordering a new set of 5 caps from Mackie. The following procedure can then be applied to the new caps.
Yes, you read right. They are caps and they can be removed by clamping them delicately, top and bottom, with a pair of bull-nosed pliers and gently pulling them up, with mild force, out of the switch receptacle. Don’t use needle-nosed pliers because they don’t distribute the pressure over a large enough area and you might crack the cap head.
Once removed, you will note that they have a plastic shaft at the back. Find a fairly large piece of cardboard or stiff paper and punch 5 appropriately sized holes in it with a bradawl or pointy object and feed the cap shafts through the holes so that only the cap heads can be seen. Place two bricks or two pieces of timber on the ground to act as supports and place the cardboard with the caps mounted, onto the supports. This is to make sure that the cap head is the only thing that can be affected by the next step.
Apply 4 or 5 light coats (swipe one way and then the other) of clear semi-gloss lacquer from a SprayPak (allowing to dry between coats). Always start the spray away from the caps to prevent “globs”. Only spray light coats because the lacquer, if applied too thickly can run which looks ugly. When totally dry, replace the caps on the transport buttons.
The legends are now highly protected from oily fingers and constant use.
Upgrading To OS V 5.1: Definitive Answers
Older Boards
1. You do not have to upgrade the CPU if you have a 166MHz processor and Mackie does not recommend it. However, if you want to give it a go, you should use a Pentium P55C 233MHz MMX processor. It must be socket 7, not the SLot 1 type. You must also set the dip switches correctly. For that and more information on the board, download the Amptron PM9800 Motherboard Manual (PDF).
2. With regard to RAM, PC100/168 pin/SDRAM/dimms (or PC133 if backwards compatible) are recommended. PNY 133 sticks may not be backwards compatible. Some say they don’t work, some say they do. 64 meg minimum is what Mackie recommends, though some have said it will run with less (albeit slower). For V5, 128 meg or up to 256 meg works better and the OS supports it. The older boards won’t support 256 meg sticks but two 128 meg sticks seem to work fine. During installation of RAM, when you handle the dimms, leave the CPU plugged in (but off at the mains for safety’s sake) and ground yourself to the CPU metal casing to avoid static discharge which may ruin the dimms. Handle them by the edges and avoid touching the chips or the gold edge connectors. It seems that just about any combination of RAM size works together. It also seems that if you use 256 meg dimms, you must have dual sided or only 128 meg will be recognized.
3. DO NOT "flash" the BIOS. You will encounter big trouble in D8B land if you do so.
4. If you have a 540 meg hard drive, you will need to upgrade it to a larger drive. You can use up to a 32 Gb hard drive, or a larger one if it can be jumpered down to read as 32 Gb. The d8b BIOS will not recognize or cannot manage HDs larger than 32 Gb. After installing the larger hard drive, you will need to format it. On the first floppy disk of the OS, there is a folder called “system” and in that folder is a file called “Tools.ini”. Open that file in a text editor program and enter a new line at the bottom of the list, “Format:on” (no quotes) and save the edited file back to the floppy. When you boot the d8b with this disk installed, you will be asked if you want to format the hard drive. Type yes (or Y as the case may be). You will then be asked again to verify. Do so. The drive will then be formatted and the d8b will prompt you to insert the remaining two disks. Follow the prompts on the fluoro screen and you will have a lovely fresh HD with V5 installed. (this process is true for V3 and V5, by the way)
5. The older CPUs (in this case the whole thing) can be upgraded by Mackie...but it is NOT cheap.
Newer Boards
1. With regard to RAM, again, 64 meg minimum. 128 meg or 256 meg is better as the OS does support it. 256meg PNY 168 pin dimms work fine. See "Older Boards" #2 for more.
2. CPU: Nothing needs to be done to the CPU. Don`t mess with it!!!!
3. Hard drive. Newer boards have larger hard drives. They don`t need to be changed. If your d8b is still under warranty, you will void the warranty if you change it unless you speak to the mothership first.
Motherboard: Which one do you have?
Newer motherboards:
Photo: SteveT
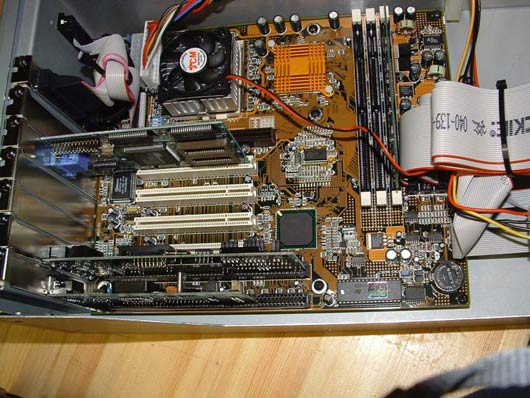 (Click on the image to zoom in)
From November 1999, the Remote Power Supply and CPU unit have a new motherboard, Celeron processor and DIMM memory modules.
Models 090-126-xx, serial number prefix “BS11954” or higher (that is, all models after Nov 1999), use the new 480-039-00 motherboard, and DC power cable.
Newer Motherboards BIOS Settings
Itox CB50-BX/ZX motherboard User Manual (961 Kb)
Itox CB50-BX motherboard DIP Switch Settings (218 Kb)
Older motherboards:
Photo: Phill C.
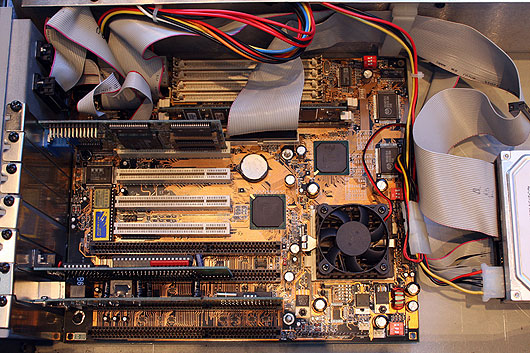 (Click on the image to zoom in)
Models 090-096-xx, with serial number prefix “AW”, and models 090-126-xx, serial number prefix “BS11953” or lower (i.e. before Nov ‘99), use the original 480-023-00 (CE-modded version is 080-113-00) motherboard.
Old Motherboards BIOS Settings
Amptron PM-9800 motherboard User Guide (149 Kb)
Transport Position Display Not Working
With OS 5 or 5.1 installed, if the d8b's Locator is coming up blank (no time code showing on the d8b SMPTE/BBT display), you probably have HUI mode on but haven't set up a HUI control in your DAW. Either turn HUI mode off (Options > HUI mode or Shift+F5) or set up a HUI in your DAW.
CPU Power Supply Replacement
POWER SUPPLIES WITHIN THE CPU/PSU RACK
1. Aztec Supply: This is the first of two 5V power supplies in the CPU/PSU rack, this one being a switching power supply which provides the D8B with 5VDC, one of many supply voltages required by the board to drive its circuitry. If this supply blows, the console will appear dead although the CPU will boot up. After fully booted up, the monitor will display an error message ("reset").
2. Sparkle Supply: This is the 5V power supply for the CPU. If the Sparkle 5V power supply in the CPU rack dies, a replacement is available in the form of a Sparkle Power Supply model SPI-250G.
3. Linear Power Supply: A small circuit board dominated by several large capacitors which provides a variety of DC voltages to the D8B console, including +48V (for phantom power), + 12 VDC, and +/- 16 VDC.
Vacuum Fluorescent Display (VFD): Replacement
If the VFD on the upper right of the D8B fails and needs to be replaced, they are manufactured by Noritake. You can't purchase directly from them in the United States. They can normally be purchased from Digikey and can be found on this page.
The original VFD part no. is: CU40025SCPB-U1J
The replacement part no. is: CU40025SCPB-W6J
It takes a bit of work to get to. You will need to remove some PC boards. DO NOT attempt to repair this on your own if you don't know how to work on electronic devices as there are many parts that can be damaged by ESD. Make absolutely sure that you and the d8b are grounded.
Transport Buttons: Intermittent or Non Working
If the transport buttons become intermittent and require several hits or hard pressing to work, the following procedure can alleviate the problem.
Carefully clamp the plastic cap of the offending button top and bottom with some bull-nosed pliers and gently pull it up and off. You will now have a more direct access to the switch itself on the PCB.
Once it is revealed, flush with a spray pak of isopropyl alcohol (at least 99%) all around on the exposed PCB and the switch. Make sure you use the plastic tube supplied that fits into the nozzle to provide a squirt to the specific switch.
Poke your finger thru the button hole in the desk and operate the switch quite a few times using a gentle circular motion and keep operating every 5 minutes or so until the alcohol has completely evaporated.
The idea is to flush out any obstructive dust particles under the metal dome inside the switch. Avoid lubricant based contact enhancers like Deoxit.
Don't replace the cap until you're satisfied that the switch is working correctly. It can sometimes take a half hour or so for this to happen. Repeat if necessary
Replacing The Motherboard and Processor: A dissertation
A few months ago my MOBO stopped recognizing the mouse/keyboard so I had to replace it. I still had the warranty from the place where I bought it and they were willing to honor it but there was no available MOBO from Mackie so I had to research for a replacement (I understand how computers work). In my research I found out that the d8b requires a chipset either 430TX or 440BX/ZX, AT factor, two serial ports with open pins, and at least 2 ISA ports. I tried all kinds of MOBOs with such criteria but not all MOBOs worked. In general, I learned that the brands that work are: Amptron (of course, the PM9800, 9600, and 9200), Microstar (e.g., MS-5156), GYGABYTEs, and of course DFIs (CB50, PB50, and other DFI models as well--as long they meet the above criteria). Stay away from SOYO, ASUS, APOLLO and practically every other brand, even if they match the above criteria. Their architecture is quite different and is not supported by the d8b application. MOBOs with a Socket 370 or Slot-1 are the new MOBOs that run with Celeron; the Socket 7 are the old MOBOs and they run with Intel MMX.
Another important concept to know is that there are too many Celeron models in the market and it could get confusing (Intel kept upgrading them). The key is to use a Celeron with a bus frequency (FBS) of 100 MHz. The processor speed does not matter but of course we want the fastest processor available. Although you could use a Celeron of FBS 66 MHz, an equivalent Celeron rated at FBS 100 MHz will run a whole lot faster, with many other advantages.
Understand also that the name Celeron is used by Intel to denominate its low cost line of processors. In fact, Celeron is an economic version of Intel's top processors. In other words, Celeron is a simplified version of Pentium II, Pentium III or Pentium 4, with some of its features being reduced or removed. Celeron distinguishes itself from Pentium II, Pentium III or Pentium 4 basically in three aspects:
- L2 memory cache size
- Internal clock
- External bus clock
Because of these differences Celeron is cheaper and of lower-performance, compared to the Pentium II, Pentium III and Pentium 4 processors, thus it fits well to the domestic users market or to those who don’t need great power in the computer. For instance, you cannot over clock an Intel Celeron processor (PPGA) because its frequency ratio has been fixed by the manufacturer.
Keeping up with the story I was able to find a CB50BX but ultimately stayed with the PB50BX model on my CPU. The CB50BX (the original MOBO) supports any Socket 370 Celeron processor that runs at either FBS = 66/100 MHz. My CB50BX is using a Celeron 850 MHz/FBS 100 MHz and it flies. This is now my spare MOBO since I am using the PB50BX which allows me to use a truly Pentium III which are faster and provide more memory-cache than an equivalent Celeron. Of course, there are even faster FBS-100MHz Celeron processors on the market. I recently saw on eBay one with FC-PGA packaging of 1.1GHz. I have not tested that one but theorically it should work as well. Again the key is that the Celeron has to be FBS at 100 MHz (not 133 MHz). At such speed however, the limitation of the D8B becomes the serial ports. Serial are the slowest ports but since the D8B uses both serial ports, that doubles the serial data transmission rate.
To install a Celeron processor faster than 550 MHz in the CB50 MOBO (remember it has to be FBS of 100 MHz) all you have to do is to change the DIP Switches on the MOBO to:
- Switch 1: On
- Switch 2: On
- Switch 3: Off
- Switch 4: Off
This is what DFI calls “Future processor and a Frequency Ratio of 8” and it is in the manual. The motherboard automatically will detect and reset voltages so there is not a risk of killing the MOBO or the processor.
The jumper jp2 is by default set at the factory with the cap sitting on pins 1 and 2. This default automatically detects the frequency of the Celeron processor (either 66/100 MHz). You do not have to change it, just verify this is the case.
About memory, PC133 is the best but you could use PC100 if that is what you have. A few brands may not work. I am using Kingston but most brands should do the job.
I thought that this information may be useful to someone, especially if installing a new MOBO and who needs to get a new Celeron anyway. Then why not go for the top performance! Or it may also help someone who needs a MOBO or is just looking for a spare. Then you would know what to look for and perhaps find a used/cheaper one on eBay, if it happened to be available, before paying $300 for a new-old style MOBO. However, if your d8b is working perfectly then you may not want to mess with it.
Another Reason For Loss Of Audio
It has been noted that some d8bs can lose all digital audio (or analog, if using AIO-8 cards), however, all other functions will still work. You may find that the audio will just stop and if you are in a session, the LED VUs will appear to lock or if the d8b is sitting idle, you will just lose audio. This has quite often been found to be caused by a loss of power to the DSP PC board, due to a faulty connection of the cable going from the power distribution board to the DSP card. You can see pictures of these connections in the photos section of the d8b database. The connectors you are looking for are the middle one found in photo 2 which is the power distribution board, and photo 6 which is the DSP card. The fifth connector from the left (the somewhat clear looking one) is the power connector.
As noted in the Ribbon Cable Connection Correction Procedure (RCCCP), it has been found that the molex type power plugs can tend to move, causing a bad connection. Removal, cleaning and re-installing said cables will usually restore audio function, at least, temporarily. Unfortunately, it may happen again due to how loose the connectors are. Using a small dab of electronics compatible silicon RTV or “hot glue” from a “hot glue gun” will help this situation. It may however, eventually happen again. You may also, very carefully, put a small “kink” in the pins of the connector using needle nose pliers which will make the connection tighter. To do this however, you must be VERY careful not to short the pins of the connector on the power distribution board as it holds some large capacitors that can still retain an electrical charge after shutdown. While doing this may be a “bright spot” in your day (as in the bright spots in your eyes) it will not be good for your pliers or the power distribution board.
As always, before working inside a d8b, please follow all grounding guidelines found in the “RCCCP” as any small amount of static discharge can ruin any of the ICs found on the PC boards.
This procedure will henceforth be known as "ARFLOA".
Loss Of Audio/Frozen Meters
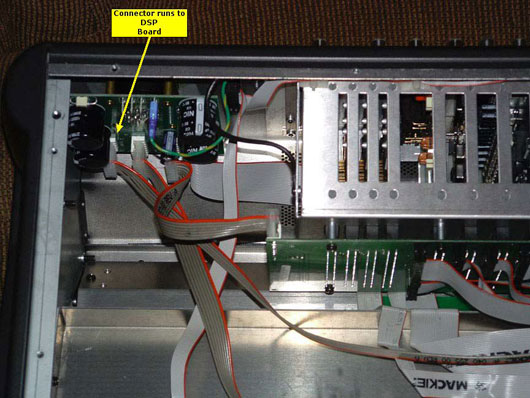
There is one particular ribbon cable and its associated connectors inside the d8b console that has been proven time and again to be the cause of loss of audio and frozen meters. It is the cable running from the power distribution PCB to the DSP PCB. All mechanical and other functions appear to operate as normal.
The following photos indicate the cable in question:
NOTE: These photos has been reduced to fit in the site's layout. Click on the images to see them in full resolution.
If you experience the above condition, it's worth diving in and making sure that the connectors at each end of this cable are snug and making secure contact. Always do so paying attention to proper static protection procedures.
See also, related topics:
Ribbon Cable Connection Correction Procedure
Another Reason For Loss Of Audio
Fader Maintenance
Just as a matter of interest, the faders are user serviceable. Clean the band with very mild soapy water and a cue tip, clean the visible wheel with isopropyl alcohol and give half a drop of sewing machine oil to the motor spindle.
Floppy Disk Creation Process for Mac users
Here's the full tested steps for restoring Mackie OS v5.1 to 3 floppy disks using an USB floppy drive and a Macintosh running OS X. Warning: UNIX/Terminal work ahead.
Step 1: Download the IMA disk files:
IMA files for the Mackie OS v5.1:
IMA files for the Plug-In Service Pack:
PLUG_SP3_3.IMA
Step 2: Go to your Applications and then to your Utilities folder. Run the Terminal Application.
Step 3: Connect your USB Floppy drive to your Mac. If you are using unformatted floppy diskettes, Initialize them by clicking on the "Initialize" button that the OS X requester will show you after inserting a floppy in your drive.
Step 4: By now, you should have a floppy disk on your desktop. Unmount the floppy partition by typing this command:
# sudo umount /dev/disk1
Step 5: Write the disk image to your floppy disk using this command:
# sudo dd if=d8b51_build445_disk1.IMA of=/dev/rdisk1
Step 6: Eject and label your first floppy "OS 5.1 Disk #1". Repeat steps 7 and 8 for diskette #2 and #3 but using the following commands instead:
- Second Floppy:
# sudo dd if=d8b51_build445_disk2.IMA of=/dev/rdisk1
- Third Floppy:
# sudo dd if=d8b51_build445_disk3.IMA of=/dev/rdisk1
Label the disks accordingly.
Step 7: To write the three Service Pack 3 disks use these commands:
- First Floppy:
# sudo dd if=PLUGS_SP3_1.IMA of=/dev/rdisk1
- Second Floppy:
# sudo dd if=PLUGS_SP3_2.IMA of=/dev/rdisk1
-Third Floppy:
# sudo dd if=PLUGS_SP3_3.IMA of=/dev/rdisk1
Don't forget to label the disks accordingly.
Step 8: Time for a beer! Close the Terminal Window, you've done enough UNIX for today!
Cheers!
BFC connector parts on internet
Hi guys!
I just want to share with you what i have found maybe i did not go trough all topics so it may not be new
but i have found the BFC (big fat connector) the pins connector and the extractor for those pins
on digi key... I need to repair mine so now I have everything to put my d8b back in shape
and no more frozen board because of bad connections.
TE Connectivity AMP Connectors 66360-4 replacement pins digi key #A1341-ND
TE Connectivity AMP Connectors 305183 extractor tool digi key #A1329-ND
TE Connectivity AMP Connectors 208457-1 Bfc connector digi key # A1613-ND the one on the cable
TE Connectivity AMP Connectors 208459-1 bfc connector digi key #A1612-ND the one screw in the d8b
Also here:
CMC PLUG ASSEMBLY,SZ 28-24
CMC RECPT ASSEMBLY SIZE 28
Best wishes to all
